

Here is how to add velocity sensitive midi input to a Korg Minipops 120 using the uniPulse.
Check Minipops-120 Single Outputs for information on how to add single outputs.
MiniPops 120P – the portable version of the MiniPops 120
There is a portable version of the MiniPops 120. While electronically identical to the normal version there are mechanical differences. Hence you`ll find details on how to install Unipulse in this PDF:
Unipulse installation in Korg MiniPops 120P
Configuration file
A uniPulse configuration file for the Korg Minipops 120 can be found here. Download the file and upload it to the uniPulse via the uniPulse Configurator.
Korg Minipops – uniPulse configuration
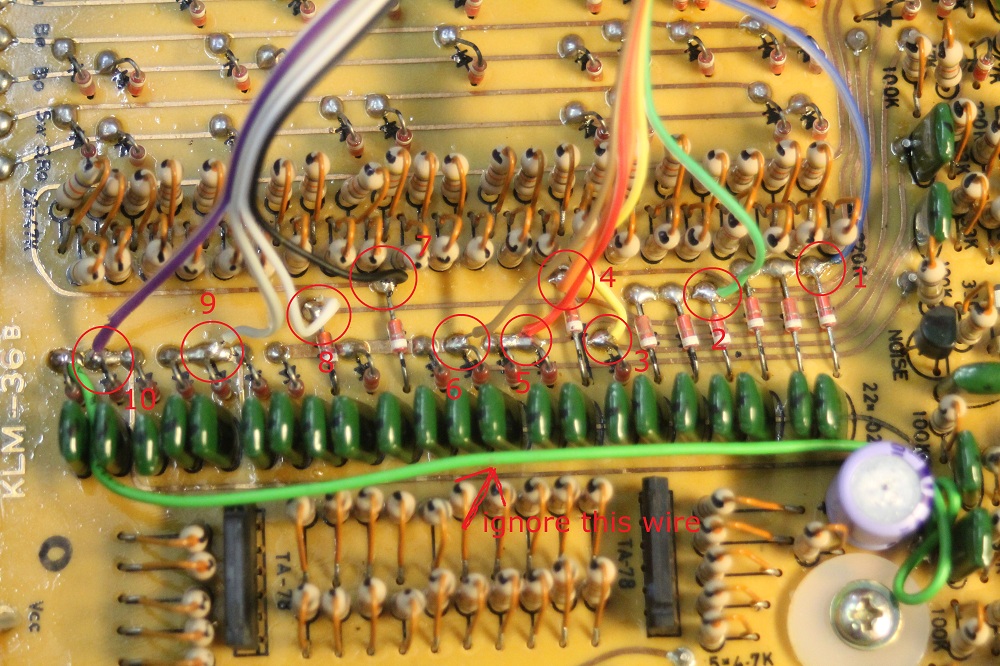
Trigger points
Very easy to get access to the trigger points. Just solder the trigger outputs form the uniPulse to the points shown in the following picture. Ignore the green wire on the bottom this is a fix for a broken trace.
Supply for uniPulse
Solder the +V and -V wires of the uniPulse to the points shown below:

Installing the midi socket
The midi socket can be installed in in the back panel of the Minipops:

Installing uniPulse PCB
The picture below shows how to fix the uniPulse PCB in the Minipops. Please make sure to put some insulation between the PCB and the metal bar. Here we used a piece of plastic.

Clock sync
User FactoryDefault on Muffwiggler investigated how to sync clock and start stop and posted some info. You need to build a small circuit with a few transistors, but it is quite simple to do:
https://www.muffwiggler.com/forum/viewtopic.php?f=17&t=234982&p=3431552#p3431552
Please note that this is untested by us.
Playing
In order to trigger the minipops properly via the uniPulse, the minipops needs to be started, but no pattern selected. This is because when stopped, the minipops mutes its output